Using MQAUSX and MQCE together is only a little more complex than uses a single MQ exit. The same software is installed on the server regardless if it is acting as a “server” or “client”. So, let’s go through a setup and test of MQAUSX and MQCE on 2 Solaris servers where 1 Solaris server is the “server-side” and the other Solaris server is the “client-side” of the test.
Information:
– Server 1 is running Solaris SPARC v9 (64-bit) with a queue manager called BIZI.QM.TST on WMQ v7.0.1.0
– Server 2 is running Solaris SPARC v10 (64-bit) and will run the MQ client application with WMQ v7.1.0.0.
Step #1: Install the MQAUSX and MQCE on both servers. Please follow instructions in the manual, the following is the short form:
On Solaris 9, use mqausx_solaris64.tar and mqce_solaris64.tar files and then run setausx.sh and setmqce.sh shell scripts as root.
On Solaris 10, use mqausx_solaris10_64.tar and mqce_solaris10_64.tar files and then run setausx.sh and setmqce.sh shell scripts as root.
Step #2: On Solaris 9 server, copy the Capitalware supplied License files (mqausx_licenses.ini and mqce_licenses.ini) for both MQAUSX and MQCE to the install directory. i.e. /var/mqm/exits64/
Note: The client-side MQAUSX and MQCE components do NOT require a License file.
Step #3: On Solaris 9 server, by default, MQAUSX will authenticate against the Local OS. If you want to authenticate against a different target then update the IniFile to reflect it (please follow the instructions as per the manual). For MQCE, the AES default key size is 128 bits. You can update the IniFile to use 128 or 192 or 256 bit.
Step #4: On Solaris 9 server, define a SVRCONN channel (‘LIOR.CHL’) in queue manager ‘BIZI.QM.TST’ to use both MQAUSX and MQCE:
DEFINE CHANNEL ('LIOR.CHL') CHLTYPE(SVRCONN) +
       TRPTYPE(TCP) +
       SCYEXIT('/var/mqm/exits64/mqausx(SecExit)') +
       SCYDATA('mqausx.ini') +
       RCVEXIT('/var/mqm/exits64/mqce(CE)') +
       RCVDATA('mqce.ini') +
       SENDEXIT('/var/mqm/exits64/mqce(CE)') +
       SENDDATA('mqce.ini') +
       REPLACE
Note: Because I did not specify the path for SCYDATA, RCVDATA and SENDDATA attributes of the channel, MQAUSX and MQCE will look for the specified IniFile in the install directory.
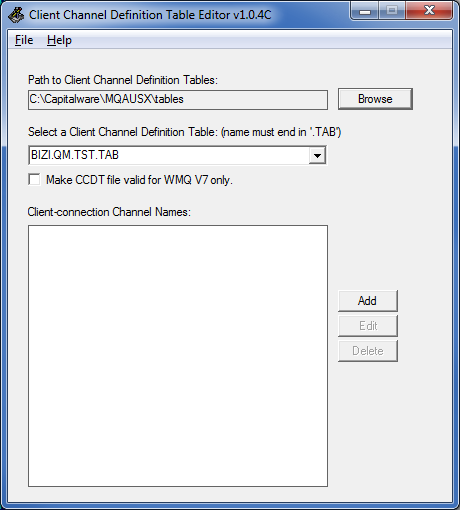
Step #5: On a Windows PC, create the CCDT (Client Channel Definition Table) file using the CCDTE program. I like to call the CCDT file by the name of the queue manager. For this example, the queue manager is called BIZI.QM.TST, so the CCDT file will be called ‘BIZI.QM.TST.TAB’.
Now input the channel name, connection name and queue manager name then select the Unix version of the security and Send/Receive exits from the dropdown.
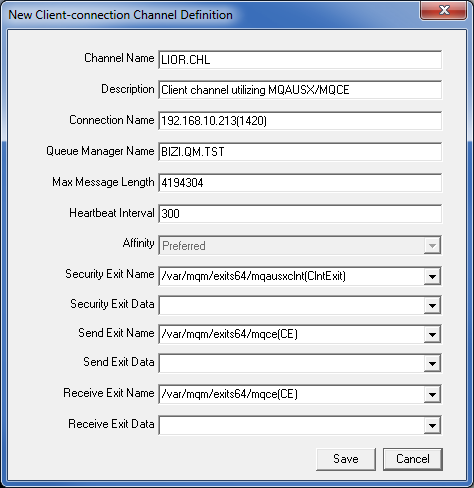
As you can see, I did not set any values for Security Exit Data, Send Exit Data or Receive Exit Data. This means that the default values (client-side) for MQAUSX and MQCE will be used.
Note: For MQAUSX client-side on Windows, the user will be presented with a popup window to input their user credentials, if the Security Exit Data field is empty. On Unix/Linux, there is no popup window hence if the Security Exit Data field is empty then the user must set the MQAUSX_UID and MQAUSX_PWD environment variables.
It would be far better to use the enc_clnt program to create the encrypted user credentials in a client-side encrypted IniFile and then set the location of the client-side encrypted IniFile in the Security Exit Data field.
Step #6: Now copy the CCDT file (‘BIZI.QM.TST.TAB’) from the Windows PC to the Solaris 10 server. Make sure you copy the file as ‘binary’. In this example, I will copy the CCDT to /export/home/tester/ directory on the Solaris 10 server.
Step #7: On Solaris 10 server, we need set some MQ environment variables:
unset MQSERVER
export MQCHLLIB=/export/home/tester
export MQCHLTAB=BIZI.QM.TST.TAB
Note: MQCHLLIB environment has 2 “L”s so be care when typing it.
And now set MQAUSX environment variables for the User Credentials:
export MQAUSX_UID=tester
export MQAUSX_PWD=abc123
Step #8: On Solaris 10 server, now that the environment variables are set, time to do a test. I will use the amqsputc and amqsgetc MQ sample programs:
Let’s put 1 message on the queue:
/opt/mqm/samp/bin/amqsputc TST1  BIZI.QM.TST
Sample AMQSPUT0 start
target queue is TST1
this is a test message

Sample AMQSPUT0 end
Now, let’s retrieve that message:
 /opt/mqm/samp/bin/amqsgetc TST1  BIZI.QM.TST
Sample AMQSGET0 start
message
no more messages
Sample AMQSGET0 end
That’s it – pretty straightforward. It is very easy to have both channel authentication and message encryption over the channel.
I strongly recommend that people not use MQAUSX_UID and MQAUSX_PWD environment variables but rather use the client-side encrypted file created by the enc_clnt program (see the next blog posting for an example).
Regards,
Roger Lacroix
Capitalware Inc.