In the MQ File Mover (MQFM) How To #2 blog posting, MQFM ran in “client mode” when it connected to the queue managers. In this blog posting, I will show how to implement a simple file transfer using End-To-End encryption when connecting to the queue manager in “client mode”.
MQFM’s Send and Watch Actions use Advanced Encryption Standard (AES) to encrypt the data. The Receive Action can decrypt the incoming data before it is written to the target file. MQFM supports the use of 128, 192 and 256-bit AES encryption/decryption.
US export restrictions limit the Java AES support to 128-bits. If the user wishes to use AES 192 or 256-bit encryption then “Java Cryptography Extension (JCE) Unlimited Strength Jurisdiction Policy Files 6” needs to be downloaded (and installed) from Oracle’s Java web page: http://www.oracle.com/technetwork/java/javase/downloads/index.html
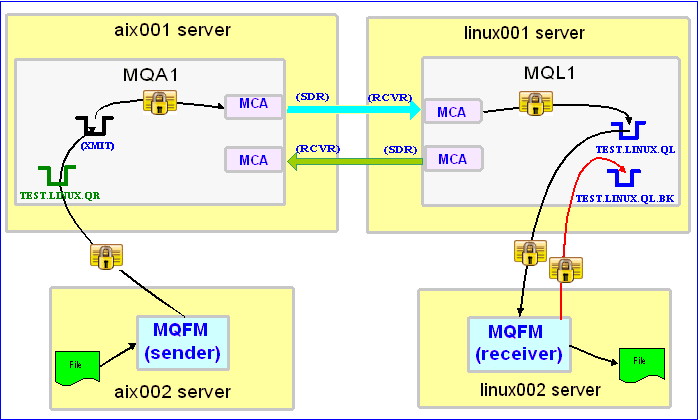
In this example, the following servers are used but they only have WebSphere MQ (WMQ) Client installed (no queue managers):
– aix002 is an AIX server with WMQ Client and MQFM software installed
– linux002 is a Linux server with WMQ Client and MQFM software installed
In this example, the following queue managers are used:
– MQA1 is a queue manager residing on a AIX (aix001) server (sender)
– MQL1 is a queue manager residing on a Linux (linux001) server (receiver)
– TEST.LINUX.QL and TEST.LINUX.QL.BK are local queues defined in queue manager MQL1 (receiver)
– TEST.LINUX.QR is a remote queue defined in queue manager MQA1 (sender)
If you do not know how to define/setup communication between 2 queue managers then follow the instructions in this blog posting:
http://www.capitalware.biz/rl_blog/?p=509
Step #1: On the linux002 server, create a file in the mq directory called mql1.xml and copy the following into the file:
    MQL1
    TEST.LINUX.QL
    linux001
    SYSTEM.DEF.SVRCONN
    1414
    tester
The mql1.xml (MQFM_MQ XML) file describes how to connect to the remote MQL1 queue manager on server linux001. The connection will use UserID of tester. If you do not have that UserID defined on the linux001 server then use a UserID that is defined.
Step #2: On the linux002 server, in the MQFM install directory, create a file called mqfm_receive_test_3.xml and copy the following into the file:
        mql1.xml
        TEST.LINUX.QL.BK


         /home/roger/MQFM/
When MQFM is started, it will run as a daemon (run=”D”) and use a backout queue called TEST.LINUX.QL.BK just in case there is an issue with a message. For decrypting the data, MQFM will use a key size of 128-bit and a PassPhrase of ‘this is the secret’. MQFM will override the message’s specified directory and use the one provided. Either create /home/roger/MQFM/ directory on your Linux server or use a directory that already exist on your Linux server.
Step #3: On the linux002 server, start MQFM to receive the file transfers:
./mqfm.sh mqfm_receive_test_3.xml &
Step #4: On the aix002 server, create a file in the mq directory called mqa1.xml and copy the following into the file:
    MQA1
    TEST.LINUX.QR
    aix001
    SYSTEM.DEF.SVRCONN
    1414
    tester
The mqa1.xml (MQFM_MQ XML) file describes how to connect to the remote MQA1 queue manager on server aix001. The connection will use UserID of tester. If you do not have that UserID defined on the aix001 server then use a UserID that is defined.
Step #5: On the aix002 server, create a file in the data directory called test.txt and put a simple text message in the file (i.e. This is a test message.)
Step #6: On the AIX server, in the MQFM install directory, create a file called mqfm_send_test_3.xml and copy the following into the file:
      data/test.txt

        mqa1.xml


        /var/mqm/
When MQFM is started, first it will encrypt the data using a key size of 128-bit and a PassPhrase of ‘this is the secret’ then MQFM will send the encrypted data.
Step #7: On the aix002 server, start MQFM to send the file:
./mqfm.sh mqfm_send_test_3.xml
MQFM will start, encrypted the data and put the encrpyted message to the specified queue then terminate.
Step #8: On the linux002 server, verify that the test file (i.e. test.txt) was put into the /home/roger/MQFM/ directory or whatever directory you specified in the mqfm_receive_test_3.xml file.
Step #9: Finally, we need to stop MQFM daemon that is running on the linux002 server. In the MQFM install directory, create a file called mqfm_putquit_test_3.xml and copy the following into the file:
mql1.xml
Step #10: On the linux002 server, run MQFM with the PutQuit action:
./mqfm.sh mqfm_putquit_test_3.xml
This blog demonstrates how to perform End-To-End encryption using MQFM at both the sender and receiver ends as MQ clients that connect to remote queue managers. You do NOT need to implement SSL or purchase SSL certificates to have secure End-To-End encryption. Besides, implementing the headache of SSL does absolutely nothing for messages sitting in the queue because SSL is only for encrypting data as it crosses the channel. MQFM provides true End-To-End encryption of the data.
Regards,
Roger Lacroix
Capitalware Inc.
One Response to End-To-End Encryption with MQ File Mover (How To #3)